Chapter 2
Managing Positions
Objectives
By the end of this chapter, you will be able to:
· Enter a position.
· Copy a position.
· Hire into a position.
· Transfer someone into a new position.
· Transfer a position to a new location.
· Reclassify a position with a new job code.
· Run the Exceptions/Override report.
Describing the Concepts That Are Associated With Managing Positions
The main concepts for Managing Positions are:
· Positions.
· Updating position changes to job data.
PeopleSoft Web-Based Learning Assistant
From the table of contents in the PeopleSoft Web-Based Learning Assistant, select PeopleSoft Human Resources, Managing Positions, Concepts.
Select and read the following concepts:
· Understanding Positions.
· Understanding Updating Position Changes to Job Data.
Activity 1: Entering a Position
In this activity, you will review the activity overview and:
· Walk-through: Enter a new position.
· Walk-through: Enter position specific information.
· Walk-through: View budget and incumbents information.
BInstructorNotes
Instructor Notes
Instruct students to use the following information when signing into PeopleSoft:
|
User ID |
Password |
|
Your assigned userID |
Your password |
If your classroom is set up to use one database rather than an individual database for each student, assign the following values:
|
Student |
Position Number |
|
Murray101 |
88000001 |
|
Murray102 |
88000002 |
|
Murray103 |
88000003 |
|
Murray104 |
88000004 |
|
Murray105 |
88000005 |
|
Murray106 |
88000006 |
|
Murray107 |
88000007 |
|
Murray108 |
88000008 |
EInstructorNotes
Activity Overview
Due to an increase of activity in the Customer Services department, you receive a request to add a new Customer Services Specialist position.
Walk-Through: Entering a New Position
To enter a new position:
1. Select Organizational Development, Position Management, Maintain Positions/Budgets, Add/Update Position Info.
The Find an Existing Value page appears.
2. Select the Add a New Value tab.
The Add a New Value page appears.
3. On the Add a New Value page, enter 88000001 in the Position Number field.
4. Click Add.
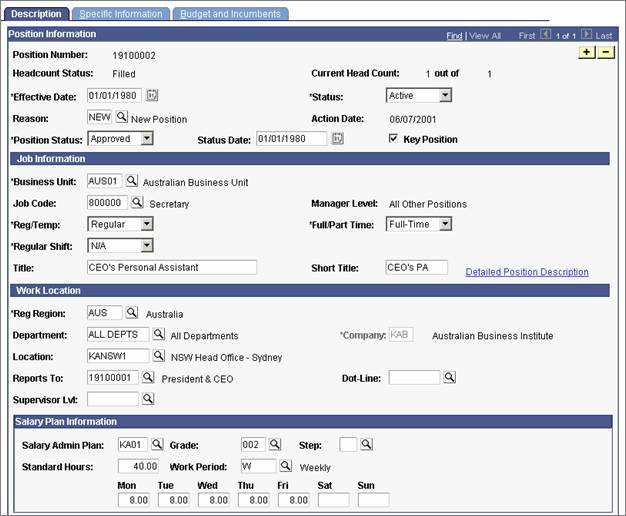
The Description page appears.
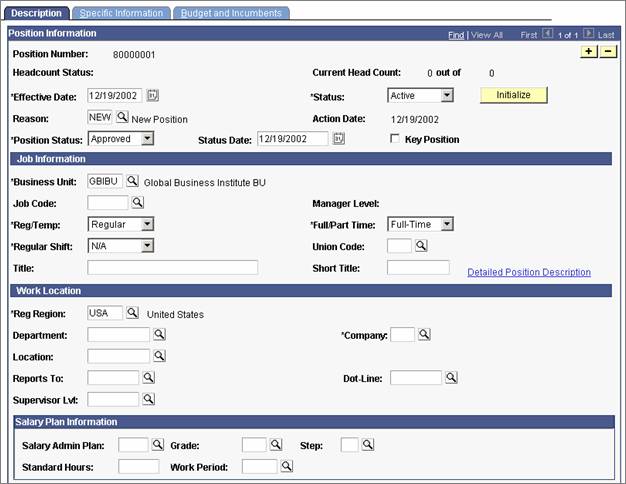
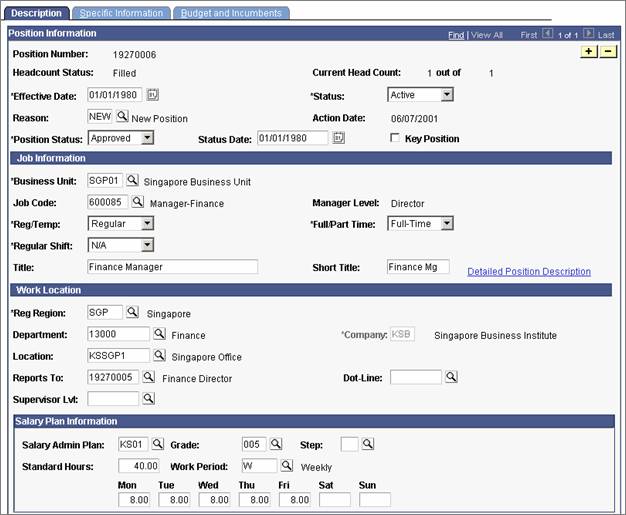
Description page
5. Enter the following information:
|
Page Element |
Value or Status |
|
Job Code |
820035 |
|
Department |
27000 |
|
Reports To |
19100004 |
|
Business unit |
Australian Business Unit |
|
Region |
|
|
Detailed Position Description |
Will be responsible for identifying key
customers in the Australian market and managing relationships with them. |
|
Location |
|
|
Salary plan information |
Automatically filled |
Note. The Effective Date field is automatically populated with the current date.
Walk-Through: Entering Position Specific Information
To enter position specific information:
1. Select the Specific Information tab.
The Specific Information page appears.

Specific Information page
2. On the Specific Information page, enter +61-7-289-8899 in the Work Phone field.
Walk-Through: Viewing Budget and Incumbents Information
To view budget and incumbents information:
1. Select the Budget and Incumbents tab.
The Budget and Incumbents page appears.
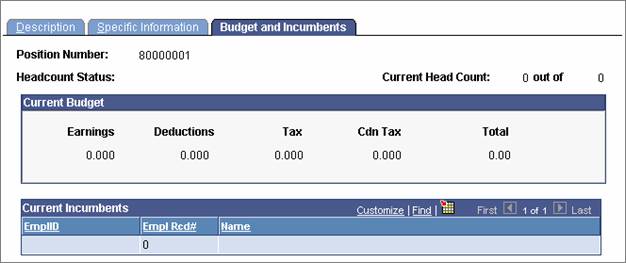
Budget and Incumbents page
2. Click Save.
This concludes the activity. Do not continue.
BInstructorNotes
Questions: Entering a Position
|
Question |
|
How can you tell if the position is part-time? |
|
Where on this component can you tell if there is an incumbent attached to this position? |
EInstructorNotes
Activity 2: Copying a Position
In this activity, you will review the activity overview and:
· Walk-through: Enter a new position.
· Walk-through: Enter a position number to copy from.
BInstructorNotes
Create a new position with the following new position numbers
|
Student |
Position Number |
|
Murray101 |
98000001 |
|
Murray102 |
98000002 |
|
Murray103 |
98000003 |
|
Murray104 |
98000004 |
|
Murray105 |
98000005 |
|
Murray106 |
98000006 |
|
Murray107 |
98000007 |
|
Murray108 |
98000008 |
EInstructorNotes
Activity Overview
Due to the high demand for Customer Services Specialists in your department, you receive a request to add another specialist position. The position information you add, will come directly from the Customer Services Specialist position you entered in Activity 1.
BInstructorNotes
EInstructorNotes
Walk-Through: Entering a New Position
To enter a new position:
1. Select Organizational Development, Position Management, Maintain Positions/Budgets, Add/Update Position Info.
The Find an Existing Value page appears.
2. Select the Add a New Value tab.
The Add a New Value page appears.
3. On the Add a New Value page, enter 98000001 in the Position Number field.
4. Click Add.
The Description page appears.

Description page
Note. The Effective Date and the Status Date fields are automatically populated with the current date.
Walk-Through: Entering a Position Number to Copy From
To enter a position number to copy from:
1. Click Initialize.
The Default Position Data page appears.
2. On the Default Position Data page, enter the position number you created first.
3. Click OK.
The Description page appears.
4. Click Save.
This concludes the activity. Do not continue.
BInstructorNotes
Questions: Copying a Position
|
Question |
Answer |
|
What is the difference between the Action Date and the Effective Date fields? |
The Action Date field is the date of data entry.
The Effective Date field is the date the position came into effect. |
|
What do you use to group jobs into general classifications? |
a. Job Code |
EInstructorNotes
Activity 3: Hiring Into a Position
In this activity, you will review the activity overview and:
· Walk-through: Enter a new hire.
· Walk-through: Enter address information.
· Walk-through: Enter personal history information.
· Walk-through: Enter identity and diversity information.
· Walk-through: Enter job data and view job information.
· Walk-through: Enter payroll information and view the salary plan.
· Walk-through: Enter compensation information.
BInstructorNotes
Instructor Notes
If your classroom is set up to use one database rather than an individual database for each student, assign the following values:
|
Student |
EmplID |
Position Number |
|
Murray101 |
AX0001 |
88000001 |
|
Murray102 |
AX0002 |
88000002 |
|
Murray103 |
AX0003 |
88000003 |
|
Murray104 |
AX0004 |
88000004 |
|
Murray105 |
AX0005 |
88000005 |
|
Murray106 |
AX0006 |
88000006 |
|
Murray107 |
AX0007 |
88000007 |
|
Murray108 |
AX0008 |
88000008 |
Note that many fields on the Job Data page default down and become unavailable to change. In a later activity you will learn how turning on the Override Position Data will make those fields available again.
Use the links at the bottom to navigate to the Job Data page.
EInstructorNotes
Activity Overview
Your company is in need of a new Customer Service Specialist, you are now hiring an applicant into that position.
Walk-Though: Entering a New Hire
To enter a new hire:
1. Select Workforce Administration, Increase Workforce, Hire Employee.
The Add a New Value page appears.
2. On the Add a New Value page, enter AX0001 in the EmplID field.
3. Click Add.
The Name History page appears.
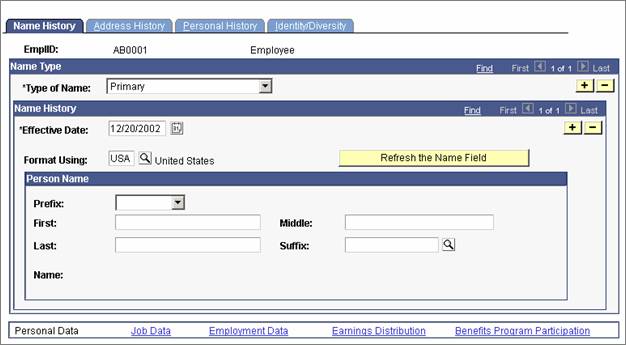
Name History page
BInstructorNotes
Notes
Use your own names in this activity.
EInstructorNotes
4. Enter the following information:
|
Page Element |
Value or Status |
|
Prefix |
Ms |
|
First |
Lauren |
|
Last |
Blake |
Note. In this activity, the Effective Date fields are automatically populated with the current date.
Walk-Through: Entering Address Information
To enter address information:
1. Select the Address History tab.
The Address History page appears.
Address History page
2. Click “Edit Address.”
The Edit Address page appears.
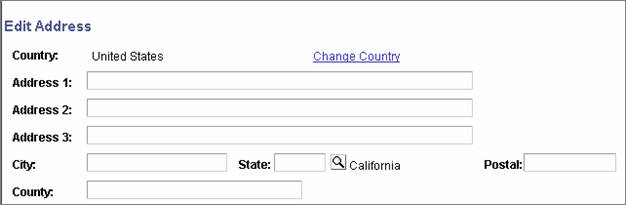
Edit Address page
3. Enter the following information:
|
Page Element |
Value or Status |
|
Address 1 |
|
|
City |
|
|
State |
|
|
Postal |
4510 |
4. Click OK.
The Address History page appears.
Walk-Through: Entering Personal History Information
To enter the personal history information:
1. Select the Personal History tab.
The Personal History page appears.
Personal History page
2. Enter the following information:
|
Page Element |
|
Gender |
|
Highest Education Level |
Walk-Through: Entering Identity and Diversity Information
To enter the identity and diversity information:
1. Select the Identity/Diversity tab.
The Identity/Diversity page appears.
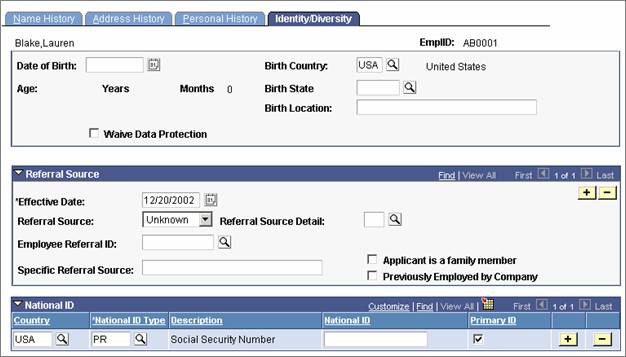
Identity/Diversity page
BInstructorNotes
Notes
Choose
|
Student |
National ID |
|
Murray101 |
56800001 |
|
Murray102 |
56800002 |
|
Murray103 |
56800003 |
|
Murray104 |
56800004 |
|
Murray105 |
56800005 |
|
Murray106 |
56800006 |
|
Murray107 |
56800007 |
|
Murray108 |
56800008 |
EInstructorNotes
2. Enter the following information:
|
Page Element |
Value or Status |
|
Date of Birth |
04/20/1968 |
|
National ID |
56800008 |
Walk-Through: Entering Job Data and Viewing Job Information
To enter the job data and view the job information:
1. Click “Job Data.”
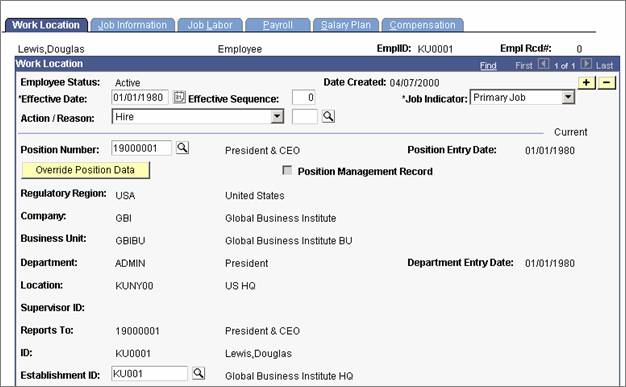
The Work Location page appears.
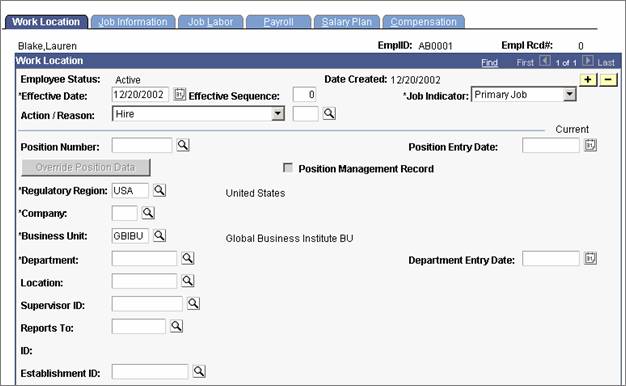
Work Location page
2. On the Work Location page, enter 88000001 in the Position Number field.
Note. Enter the position number created in Activity 1.
3. Select the Job Information tab.
The Job Information page appears.
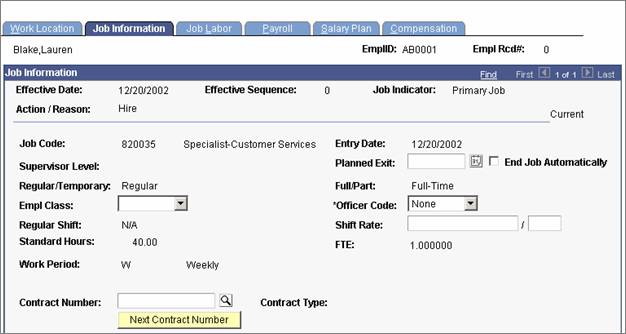
Job Information page
Note. The Job Information page is for viewing.
Walk-Through: Entering Payroll Information and Viewing the Salary Plan
To enter payroll information and view the salary plan:
1. Select the Payroll tab.
The Payroll page appears.
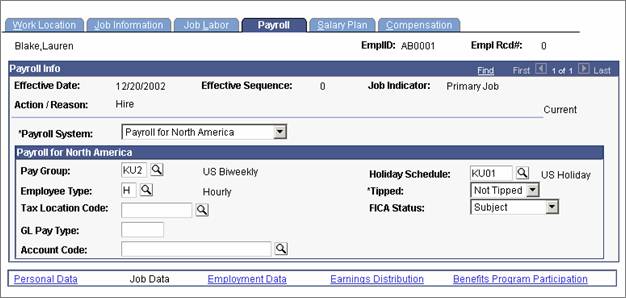
Payroll page
2. On the Payroll page, enter L00012 in the Tax Location Code field.
3. Select the Salary Plan tab.
The Salary Plan page appears.
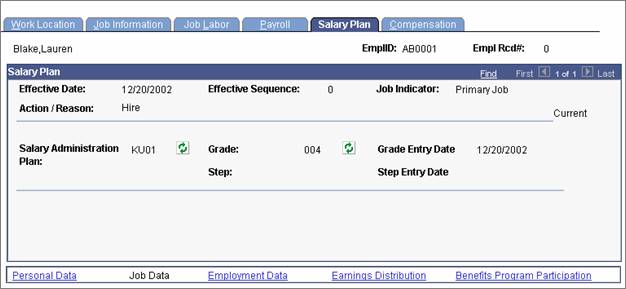
Salary Plan page
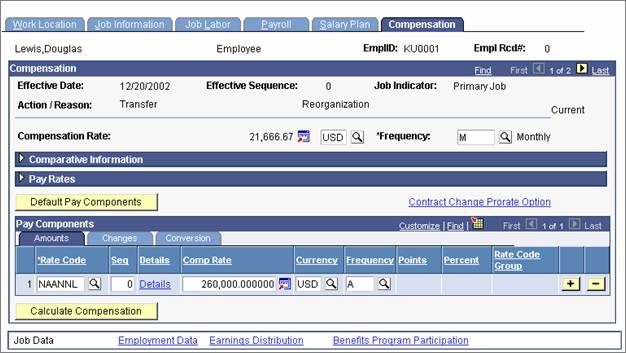
Walk-Through: Entering Compensation Information
To enter compensation information:
1. Select the Compensation tab.
The Compensation page appears.

Compensation page
2. Choose Australian Dollars as the currency
3. Click Default Pay Components.
4. Enter the following information:
|
Page Element |
Value or Status |
|
Rate Code |
K0GRCH |
|
Comp Rate |
20 |
|
Currency |
AUD |
|
Frequency |
H |
5. Click Calculate Compensation.
6. Click Save.
Note. If any warnings appear, click OK to accept.
This concludes the activity. Do not continue.
BInstructorNotes
Activity 4: Transferring Someone Into a New Position
In this activity, you will review the activity overview and:
· Walk-through: Transfer into a new position.
· Walk-through: Calculate compensation.
BInstructorNotes
Instructor Notes
Use the following values:
|
Student |
EmplID |
Name |
Position ID |
New Position ID |
|
Murray101 |
KU0001 |
Douglas Lewis |
19000001 |
19000003 |
|
Murray102 |
KU0078 |
Jason Tomita |
19000003 |
19000006 |
|
Murray103 |
KU0112 |
Larry J McKinney |
19000003 |
19000006 |
|
Murray104 |
KU0051 |
Dilon Schuster |
19000006 |
19000003 |
|
Murray105 |
KU0064 |
Benny Wong |
19000006 |
19000003 |
|
Murray106 |
KU0082 |
Mable Saxon |
19000006 |
19000003 |
|
Murray107 |
KU0006 |
Arthuro Erickson |
19000013 |
19000004 |
|
Murray108 |
KU0046 |
Rosanna Channing |
19000013 |
19000004 |
This activity shows that when transferring an employee, students use the Workforce Administration business process. In the following activity, when the students transfer the position they will use the Organizational Development business process.
EInstructorNotes
Activity Overview
Due to your company’s re-organization, Douglas Lewis must transfer into a new position. You are to enter this information in PeopleSoft.
Walk-Through: Transferring Into a New Position
To transfer into a new position:
1. Select Workforce Administration, Job Information, Job Data.
The Find an Existing Value page appears.
2. On the Find an Existing Value page, enter the following KU0001 in the EmplID field.
3. Click Search.
Note. When you click search, if you get a list of employee record numbers, click “0” in the Empl Rcd Nbr column.
The Work Location page appears.
Work Location page
4. Click Add a New Row.
5. Enter the following information:
|
Page Element |
Value or Status |
|
Action /Reason |
Transfer, ROR |
|
Position Number |
Choose your number from the table |
Note. The Effective Date field is automatically populated with the current date.
Walk-Through: Calculating Compensation
To calculate the compensation:
1. Select the Compensation tab.
The Compensation page appears.
Compensation page
2. Click Default Pay Components.
3. Click Calculate Compensation.
4. Click Save.
Note. If any warnings appear, click OK to accept.
This concludes the activity.
BInstructorNotes
Activity 5: Transferring a Position to a New Location
In this activity, you will review the activity overview and:
· Walk-through: Transfer a position to a new location.
· Walk-through: View updated employee information.
BInstructorNotes
Notes
Use the following values:
|
Student |
EmplID |
Name |
Position ID |
Country |
New Location |
|
Murray101 |
KA0012 |
Christine Nicole Evers |
19100002 |
AUS |
KASA1 |
|
Murray102 |
KN0001 |
Jeroen an de Berg |
19220001 |
AUS |
KN05 |
|
Murray103 |
KN0002 |
Annemiak Schipper |
19220002 |
NETH |
KN05 |
|
Murray104 |
KN0005 |
Margreet Willemse-Buiten |
19220003 |
NETH |
KN05 |
|
Murray105 |
KN0006 |
Ahmed Abd El Aoui |
19220004 |
NETH |
KN05 |
|
Murray106 |
KN0007 |
Anton Driessen |
19220005 |
NETH |
KN05 |
|
Murray107 |
KN0010 |
Maarten Van Diepen |
19220006 |
NETH |
KN05 |
|
Murray108 |
KN0008 |
Yenni Olcer |
19220007 |
NETH |
KN05 |
|
Murray101 |
KN0003 |
Kees den Bakker |
19220008 |
NETH |
KN05 |
This activity illustrates how making a change to the position will automatically update the incumbent. The following activity will be similar but will not illustrate an example of when the incumbent is not automatically updated because Override Position Data is on. In this activity, when you view the employee’s updated record, you will note that the date is the same, the action is position change and the reason is what you selected on the position. Finally, the Position Management Record check box is on, showing that the row was entered by the system.
EInstructorNotes
Activity Overview
The Australian Business Institute has decided to re-organize, therefore, transfer this position to its new location.
Walk-Through: Transferring a Position to a New Location
To transfer a position to a new location:
1. Select Organizational Development, Position Management, Maintain Positions/Budgets, Add/Update Position Info.
The Find an Existing Value page appears.
2. On the Find an Existing Value, enter 19100002 in the Position Number field.
3. Click Search.
The Description page appears.
Description page
4. Click Add a New Row.
5. Enter the following information:
|
Page Element |
Value or Status |
|
Reason |
XFR |
|
Location |
KASA1 |
Note. The Effective Date field is automatically populated with the current date.
6. Click Save.
Walk-Though: Viewing Updated Employee Information
To view the updated employee information:
1. Select Workforce Administration, Job Information, Job Data.
The Find an Existing Value page appears.
2. On the Find an Existing Value page, enter KA0012 in the EmplID field.
3. Click Search.
The Work Location page appears.
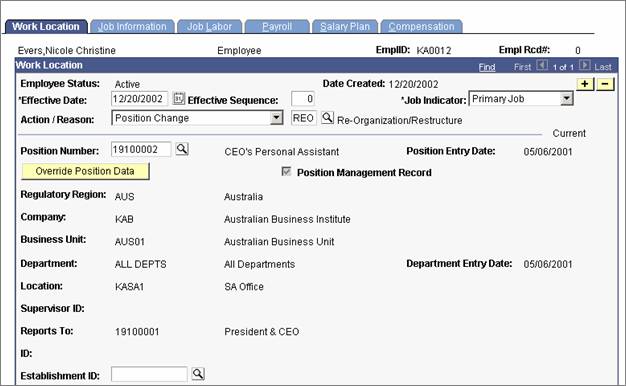
Work Location page
This concludes the activity.
Note. View the Location row inserted by
Position Management. The Position Management Record check box is on, indicating
that the system populated this data.
BInstructorNotes
Activity 6: Reclassifying a Position With a New Job Code
In this activity, you will review the activity overview and:
· Walk-through: Override position data.
· Walk-through: Reclassify a position with a new job code.
· Walk-through: Update employee position related data.
BInstructorNotes
Notes
Use the following values:
|
Student |
EmplID |
Name |
Position ID |
Country |
Job Code |
|
Murray101 |
KS0012 |
Saimee Iskandar |
19270006 |
|
420050 |
|
Murray102 |
KS0010 |
John Max Andrews |
19270002 |
|
600085 |
|
Murray103 |
KS0005 |
Ah Tech Tan |
19270003 |
|
170005 |
|
Murray104 |
KS0013 |
Kheng Siang |
19270004 |
|
120010 |
|
Murray105 |
KS0016 |
Osman Abdullah |
19270005 |
|
600085 |
|
Murray106 |
KS0011 |
Rajan Moorthy |
19270001 |
|
420060 |
|
Murray107 |
KS0009 |
Ming Yi Wang |
19270008 |
|
170035 |
|
Murray108 |
KW0002 |
Rudolph Van de Meer |
19320002 |
|
790000 |
|
9 |
KW0003 |
Wilfred Daan Goldman |
19320003 |
|
600045 |
This activity is intended to illustrate the ramifications of turning on Override Position Data for the employee. That is, if an employee has this on, and the position is updated, unlike the previous activity, the incumbent will not automatically be updated.
The first walk-through involves simple turning on Override Position Data using Correct History mode. Tell students they are not inserting a row because they are going to assume that someone else selected this on a prior occasion. Have them click Override Position Data on and off a few times so they see how the fields become available, and then unavailable when you select Use Position Data.
A reason for turning on Override Position Data is to make the fields on the Job Data page available for change. Most people don’t realize that they should not select this. It is preferable to make changes to the position and have the system automatically update the incumbent.
The only times you should select Override Position Data is if:
· Indeed the employee and position should not match a former employee.
· You have to perform a quick fix to the employee because he/she was not updated by the position due to effective dating issues.
EInstructorNotes
Activity Overview
You have been tasked with updating the job code for this opposition. When you do so, you are surprised to find out that the system did not automatically update the incumbent with the new job code! Of course! Override Position Data was selected previously, therefore blocking the free flow of information between the position and the incumbent. You are forced to manually update the employee with the new job code.
Walk-Through: Override Position Data
To override position data:
1. Select Workforce Administration, Job Information, Job Data.
The Find an Existing Value page appears.
2. Select Correct History.
3. On the Find an Existing Value page, enter KS0012 on the EmplID field.
4. Click Search.
The Work Location page appears.
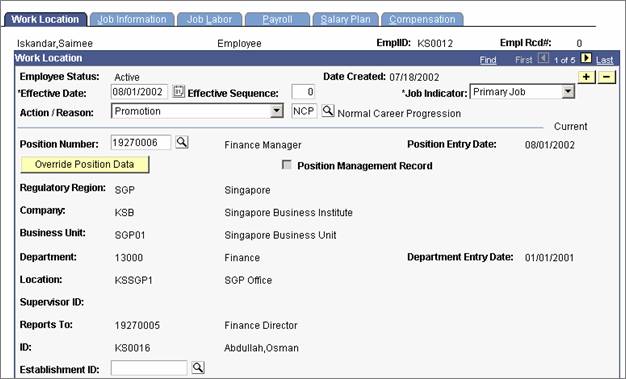
Work Location page
5. Click Override Position Data.
6. Click Save.
Note. If any warnings appear, click OK to accept.
Walk-Through: Reclassifying a Position With a New Job Code
To reclassify a position with a new job code:
1. Select Organizational Development, Position Management, Maintain Positions/Budgets, Add/Update Position Info.
The Find an Existing Value page appears.
2. On the Find an Existing Value page, enter 19270006 in the Position Number field.
3. Click Search.
The Description page appears.
Description page
4. Click Add a New Row.
5. Enter the following information:
|
Page Element |
Value or Status |
|
Reason |
JRC |
|
Job Code |
420050 |
Note. The Effective Date field is automatically populated with the current date.
6. Click Save.
Walk-Through: Updating Employee Position Related Data
To update the employee position related data:
1. Select Workforce Administration, Job Information, Job Data.
The Find an Existing Value page appears.
2. On the Find an Existing Value page, enter KS0012 in the EmplID field.
3. Click Search.
The Work Location page appears.
Work Location page
4. Click Add a New Row.
Note. Sometimes you’ll notice that the position name next to the Position Number field changes when you click Add a New Row.
The Effective Date field is automatically populated with the current date.
5. On the Work Location page, enter Position Change, JRC from the Action/Reason drop-down list box.
6. Click Save.
This concludes the activity.
BInstructorNotes
Activity 7: Running Exceptions/Override Report
In this activity, you will review the activity overview and:
· Walk-through: Enter parameters for the exceptions and override report.
· Walk-through: Enter process scheduler request information.
· Walk-through: View report.
BInstructorNotes
Notes
Use the following values:
|
Student |
Run Control ID |
|
Murray101 |
POS01 |
|
Murray102 |
POS02 |
|
Murray103 |
POS03 |
|
Murray104 |
POS04 |
|
Murray105 |
POS05 |
|
Murray106 |
POS06 |
|
Murray107 |
POS07 |
|
Murray108 |
POS08 |
|
9 |
POS09 |
EInstructorNotes
Activity Overview
You are concerned that due to the frequent use of Override Position Data, many incumbents are not matching their position data. Run the Exception/Override report to identify all the employees whom have Override Position Data selected.
Walk-Through: Entering Parameters for the Exceptions and Override Report
To enter parameters for the exceptions and override report:
1. Select Organizational Development, Position Management, Position Reports, Exception/Override.
The Find an Existing Value page appears.
2. Select the Add a New Value tab.
The Add a New Value page appears.
3. On the Add a New Value page, enter POS01 in the Run Control ID field.
4. Click Add.
The Parameters page appears.
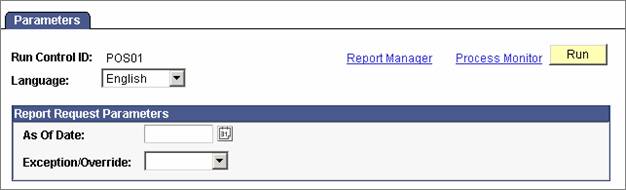
Parameters page
5. Enter the following information:
|
Page Element |
Value or Status |
|
As of Date |
Current date |
|
Exception/Override |
Override |
Walk-Through: Entering Process Scheduler Request Information
To enter process scheduler request information:
1. Click Run.
The Process Scheduler Request page appears.
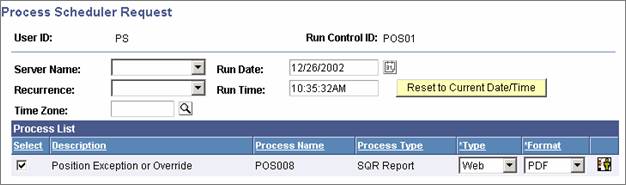
Process Scheduler Request page
2. On the Process Scheduler Request page, select PSNT from the Server Name drop-down list box.
3. Click OK.
The Parameters page appears.
Note. A process instance number will appear below the Run button on the Parameters page. Record this number to reference later.
4. Click “Process Monitor.”
The Process List page appears.
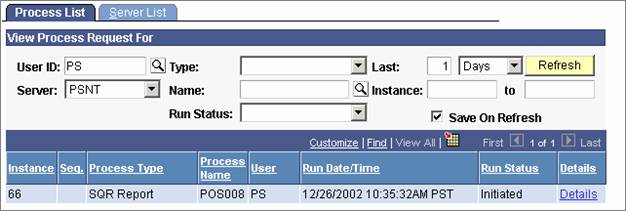
Process List page
5. On the Process List page, select PSNT from the Server drop-down list box.
6. Click Refresh until the Run Status reaches success.
7. Click “Details” for the process instance recorded earlier.
The Process Detail page appears.
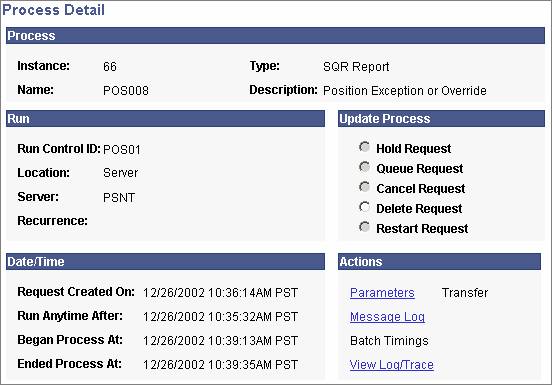
Process Detail page
Walk-Through: Viewing Report
To view the report:
1. Click “View Log/Trace.”
The View Log/Trace page appears.
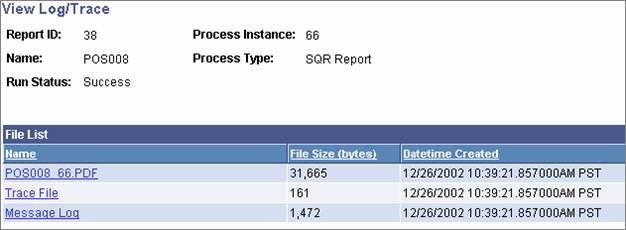
View Log/Trace page
2. Launch the PDF file.
The Override Report page appears.
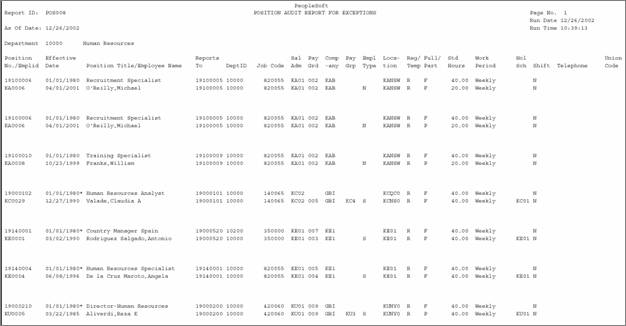
Override Report page
This concludes the activity. Do not continue.
BInstructorNotes
Activity 8: Entering a Position
In this activity, you will review the activity overview and enter a position.
BInstructorNotes
Notes
Use the following values:
|
Student |
Position Number |
|
Murray101 |
85000001 |
|
Murray102 |
85000002 |
|
Murray103 |
85000003 |
|
Murray104 |
85000004 |
|
Murray105 |
85000005 |
|
Murray106 |
85000006 |
|
Murray107 |
85000007 |
|
Murray108 |
85000008 |
|
9 |
85000009 |
|
10 |
85000010 |
|
11 |
85000011 |
|
12 |
85000012 |
EInstructorNotes
Challenger Activity
Your Human Resources department (Department 10000) is in need of a clerk (Job Code 290000). The position will be managed by a Senior Manager in Human Resources (19100004). You are to add this position in PeopleSoft.
Review
In this chapter, you learned that:
· The Add/Update Position Info component has many of the same fields as the employee Job Data record.
· Hiring an employee into a position is fairly quick. When you enter the position many values in the Job Data page default in.
· When you update the position, the system will automatically update the incumbent unless you click Override Position Data or there are effective date issues.
· The Exception/Override report identifies incumbents who do not match their position information.